Haverford faculty, students, and staff can get a Pro Zoom account under the Haverford college site license with Haverford credentials. You need a zoom account to host zoom meetings (classes), but you do not need a zoom account to join zoom meetings. Therefore, your students including Bryn Mawr and Swarthmore students can join your zoom sessions even if they do not have a zoom account. All they need to do is to download and install the free Zoom app on their devices in advance of the first class meeting. That said, we do encourage students to also create their own accounts for security reasons. Please share this zoom student guide with your students (including Bryn Mawr and Swarthmore students).
Updates
We will try our best to protect our zoom meeting environment by adjusting our default settings. As a meeting host, you should adjust your own meeting settings to work for your needs in your Zoom web portal. Zoom shared Best Practices for Securing Your Virtual Classroom in their blog. Please watch the video below.
We have some recommendations including sharing meeting information with your students only in Moodle to keep it private and enabling Waiting Room.
As we adjust our default settings, we will keep you updated here.
3/22 – We adjusted our default setting for Screen sharing. Now it is set to Host Only. If you want your students or guests to share their screens, you can change the setting during the meeting. Please see the instructions.
3/24- We turned OFF File Transfer through the in-meeting chat. Please use other methods such as Moodle, Box, Google Drive to share files with your students.
Access and Install Zoom
- Go to https://haverford.zoom.us
- Click Sign in, and log in with your Haverford credentials
- Download Zoom Client for Meetings to your computer
(Note: If you already have a Zoom account, when you go to https://haverford.edu, Zoom will ask you whether you want to migrate your account to the Haverford site license. You want to switch to a new account if you have been using a free account since you will get a pro account under the Haverford site license. If you have been already using a Pro account, you can keep your account as it is for now if you want, or migrate to the Haverford site license. If you want to migrate, click the button “Switch to the new account.”)
Getting Started with Zoom
There are a substantial number of guides that will teach you the mechanics of using Zoom.
One helpful resource is Zoom’s Help Center at https://support.zoom.us/hc/en-us that includes an in-depth Getting Started guide and a collection of one minute video introductions.
Zoom hosts free and interactive live training webinars daily.
- Zoom Meeting For Education (Students and Educators) (45 minutes)
- Here is the webinar recording from March 12, 2020.
- Getting Started with Zoom Meetings (30 minutes)
- Zoom Meetings (60 minutes).
Live trainings are great since you can ask questions, but you can also watch recorded training sessions from the same link.
LinkedIn Learning also has a great class on Zoom (45 minutes). Please login with your Haverford email and password.
Practice with Zoom
Before you use Zoom to teach, take some time to practice.
Test your internet connection by joining a test meeting. https://zoom.us/test
Because Zoom runs on multiple devices – including mobile phones – one great way to practice is to launch a Zoom meeting on your computer and then sign into that meeting on your iPhone, iPad, or Android Device. Leave the audio off in order to avoid getting feedback. Zoom’s Host and Co-Host Controls in a Meeting guide reviews most of the functions you will need to know.
You may also want to practice with your students by scheduling a low-stakes, introductory class meeting in Zoom with the sole purpose of having all of your students log in and troubleshoot the four most common technical issues: students unable to see or be seen, students unable to hear, students who cannot be heard, or students’ microphones picking up background noise or causing an echo. These guides should help:
- My Video/Camera Isn’t Working
- Testing computer or device audio
- Attendee Controls in a Meeting (including mute and unmute)
- Audio Echo In A Meeting
Teach Your Students How to Use Zoom as Students
Chances are most of your students have used video chat software like Facetime, Google Hangouts Meet to communicate with friends. That’s different than using web conferencing for scholarly purposes. Do not assume that your students know how to use or learn in Zoom. You will have to teach them. In particular:
- Remind your students to download and install the free Zoom app on their devices well in advance of the first class meeting. (Your students do not need a Zoom account to join your session, though it is recommended for security reasons.)
- Give your students a tour of the Zoom interface during your first class session and teach them how to mute and unmute themselves. Remember: This may be the first time your students have ever used Zoom.
- Determine if you are going to require your students to have their web cameras on during your entire class or if you are going to allow them to turn them off and set that as a class rule during your first Zoom meeting.
- Remind your students about the importance of being mindful about what is happening behind them when their web cameras are on, particularly when it comes to roommates who may unknowingly be in the background. It is possible to set a virtual background.
- Show students how you want them to get your attention. In small classes, some professors ask students to raise their hands on their web cameras. Others ask students to unmute themselves and simply chime in. In larger classes, you may want to consider using Zoom’s built-in nonverbal feedback buttons.
- Demonstrate to your students that to maintain eye contact in Zoom they should look at their web cameras, not their screens.
- Set some ground rules on how you want your students to use the Chat box.
- Show your students how to use the Alt + Tab keys on their Windows laptops or the Command + Tab keys on their Mac laptops to switch back and forth between Zoom and whatever program they use to take notes.
Other Features
Use Zoom’s Mute Function
One of the frequent pitfalls of video conferences is that some remote users will accidentally leave their microphones on, drowning out the class’ conversation with background noise. Knowing how to use Zoom’s mute function will help you wrestle back control.
To mute or unmute all participants (except yourself),
1. Click on Manage Participants in the meeting control toolbar;

2. Click the Mute All or Unmute All button at the bottom of the participants list.
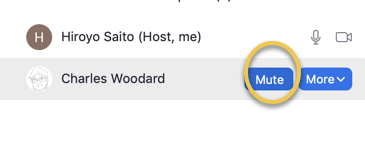
To mute or unmute a particular participant,
1. Click on Manage Participants in the meeting control toolbar;

2. Hold your mouse over the name of the participant
3. Click Mute or Unmute
Note: The first time you manually try to unmute a muted participant, that participant will be asked to either “Unmute now” or “Stay muted.”
Share your screen
It is easy to share your screen, specific applications such as PowerPoint (, which needs to be open), whiteboard, mobile devices such as iPad and iPhone. For example, if you share your iPad, you can teach using an interactive whiteboard app such as a free Jamboard app or ExplainEverything app.
By default, only hosts can share screens for security reasons.
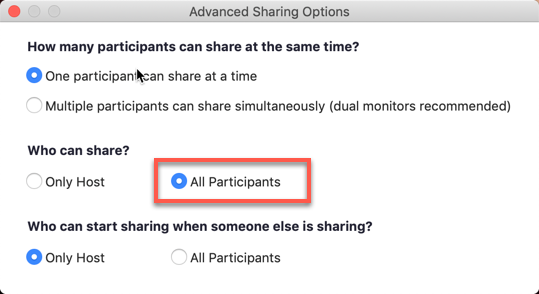
During the meeting, if you want your students to share screens, click the Advanced Sharing Options….
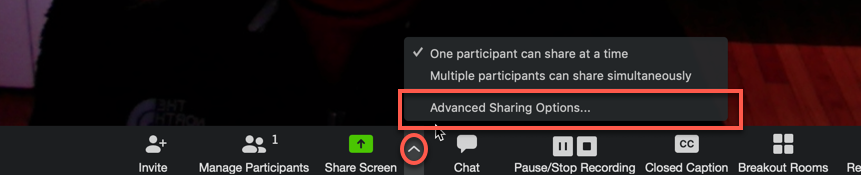
Then choose All Participants.
Use Breakout Rooms
Zoom allows you to split your students into separate breakout rooms for small group projects and discussions.
Breakout rooms are enabled by default for Haverford enterprise Zoom licenses. While you can pre-assign breakout rooms during the setup process, we recommend setting them up manually during each meeting. In order to pre-assign breakout rooms, all of your students would need to have personal accounts setup, which is most likely not the case since students do not need to have their own accounts to join one of your sessions. Here is a useful article and video from Zoom about Managing Breakout Rooms.
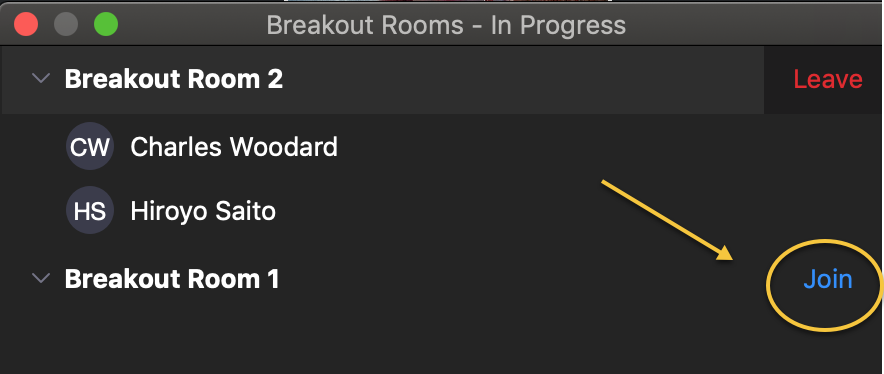
In their own breakout rooms, your students can share their screens and exchange chats with the other participants in the same room. They can also click the Ask for Help button to request help from the meeting host. The meeting host will be notified. See Participating in Breakout Rooms for more information.
If you have Co-Hosts, they can move between breakout rooms. The caveat is that the Co-Hosts must be in one of the breakout rooms in order to move between rooms. If they are joining from the main meeting room, they can only go to the breakout room they were assigned to by the main meeting host. If they come back to the main room, they can go back to the last room they were in. Then from there, they can go to any breakout rooms.
Poll Your Students
One of the best ways to get immediate student feedback is to poll your students during class. Zoom has a built-in polling tool. You can watch a video by Zoom to learn how to use the polling tool. You can add poll questions before class begins. After scheduling a meeting, go to that meeting’s settings in your browser (not the desktop app). At the bottom of the screen, you will see the polling section and you can add questions there. You can manually create poll questions during class as well.
You can create a maximum of 25 polls for a single meeting and each poll can have 10 questions. If a poll contains multiple questions, your students must answer all of the questions and then click submit before Zoom records any of the students’ answers. In addition, only single choice or multiple-choice questions are allowed. For more questions, please go to Polling for Meetings.
RECORDING
Where to store recordings
As a meeting host, you can record the meeting. You have the option of recording to your desktop or to the Cloud. If you want to share the recordings with your students later, it is easier to share if you record it to the Cloud. By default, all cloud recordings require a password, though this can be changed by pressing the “share” button next to your recording. Automatic Transcription is available for cloud recordings, though it will not be included with local recordings.
You can store all the recordings to zoom’s cloud. However, zoom’s cloud storage is limited. We recommend you develop the habit of moving needed recordings to unlimited storage locations such as Box or Google Drive and delete recordings from zoom’s cloud service in a timely manner.
Please note: By default, all cloud recordings are set to delete after 30 days. You can disable this on a recording to recording basis, but we ask that you only store videos that students are actively viewing in the cloud. All other recordings should be archived elsewhere.
If your students are already accustomed to viewing class recordings in Moodle, you can opt to host a Zoom session and record your session via Panopto simultaneously.
By default, your students can ask you, meeting host, for the permission to record locally. If you want, you can change the setting (in Settings > Recording> Local recording > uncheck “Hosts can give participants the permission to record locally”) so that they do not see the record button.
If your students clicks the Record button to request for the permission to record, you as a host can Allow Record under participants if you want.

Please note that each time a student starts, pauses, and resumes recording, everyone will get the pop-up window to consent to be recording or hear a notification if participants are connected to the computer audio or by telephone.
Alert Your Students That You Are RECORDING
Pennsylvania State Law requires that you inform students that you are recording the session in advance. Zoom will always notify meeting participants that a meeting is being recorded.
When you click the Record button in Zoom, your students will see the following alert on their screens:

Under Haverford enterprise Zoom licenses, participants connected to the computer audio or by telephone will also hear a notification each time the recording is started, paused, resumed from being paused, or stopped.
Even though your students will be asked to consent, it is a good idea to alert your students before you start recording to give them time to mute their video camera or microphone. Students can also edit their names under Personal> Profile.
If you record a class meeting and students stick around after class to ask questions, stop the recording before answering the questions … and consider using breakout rooms as those rooms are not included in the primary recording.
As with face-to-face classes, your students will remain connected around after your Zoom class meetings end to ask questions. Some of these questions can be deeply personal. You do NOT want to record those. Stop the recording before you take any questions. Also, if there are a lot of students hanging out after class and one of the students needs to talk to you about something private, offer to put that student in a private breakout room.
Help your students troubleshoot
The remote control feature allows you to take control of another participant’s screen in a meeting. You can either request remote control of another participant’s screen or the other participant can give control to you.
Assign co-hosts
If you are teaching with somebody else or have a TA, consider assigning a Co-Host. (Please note that co-hosts need to have their own zoom accounts. Haverford students can get their own Zoom accounts.) Co-Hosts can manage the administrative side of the meeting, such as managing participants or starting/stopping the recording. The host must assign a co-host. There is no limitation on the number of Co-Hosts you can have in a meeting. Co-Hosts cannot start breakout rooms or move participants from one breakout room to another, but they can move move between breakout rooms. Please see the instructions above in the breakout section. If you want somebody to start a meeting, you need to assign an Alternative Host. (Co-Hosts cannot start a meeting, but Alternative Hosts can.) Please note that you will only be able to assign users within our licensing as alternative hosts. You can also see Host and Co-Host Controls in a Meeting and Roles in a meeting for limitations.
Office Hours
If you want to use Zoom for your office hour, we recommend you enable the Waiting Room option instead of Join Before Host, so that you can control when a student joins the meeting. The Waiting Room feature allows the host to control when a participant joins the meeting. As the meeting host, you can admit attendees one by one or hold all attendees in the waiting room and admit them all at once. This is a good way to secure your meetings from unwanted visitors too.
Note: If the Waiting Room option is enabled, Join Before Host will not work for that meeting or meetings.
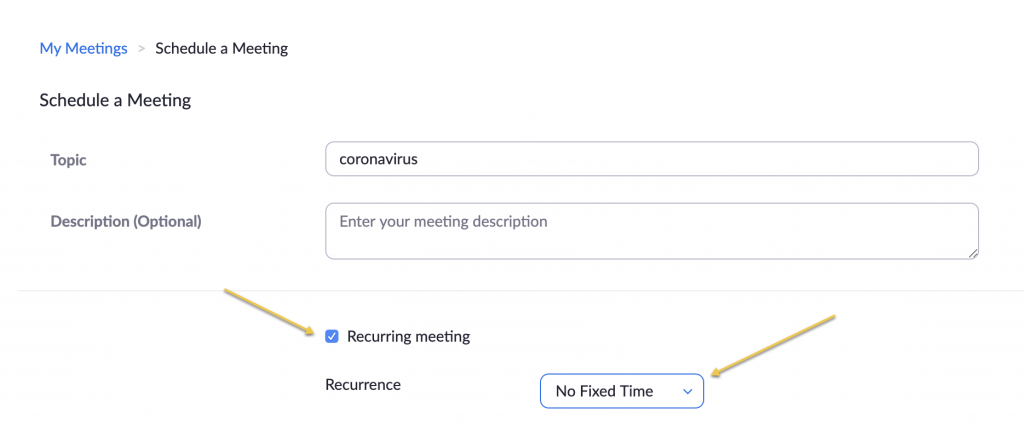
Recurring with No Fixed Time for your classes
Probably you meet with the same group of students for a class. If that is the case, you can set a Recurring meeting with No Fixed Time and you can keep the same URL for all the meetings for the class. That way, you can use the same meeting settings and URL over and over with the same group no matter when you get together. Make sure that you and your students have the meeting URL secure (see the Zoom Security section). We recommend you post the meeting URL in your course in Moodle.
Zoom Security: Avoid an unwanted ‘Zoombomb’
There are several features built into Zoom that allow you secure your meetings from unwanted visitors. This blog article by Zoom “Best Practices for Securing Your Virtual Classroom” including the video below is a great resource.
The following tips are provided to help you continue with your synchronous instruction in Zoom without the burden of uninvited attendees.
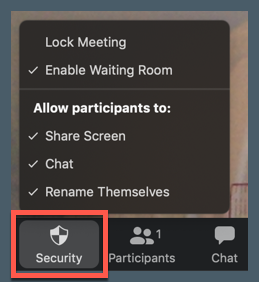
Please Note: Zoom has added a security tab at the bottom of their window which will allow you to quickly lock the meeting, enable the waiting room or allow participants to utilize certain features.
Keep Meeting Info Private: Share Meeting Links in Moodle
Avoid posting your links in a public place like social media or a public calendar. For your class, you are strongly advised to share your zoom information (your zoom meeting link) in Moodle so it is only accessed by students enrolled in your class. Please ask students not to post the links in any unprotected spaces.
If you or your students include the meeting information on calendar apps such as Calendly or Google Calendar, please ensure that the calendar is set to private.
- For Google Calendar, navigate to your calendar by selecting it from your G-Suite option bar in the top right corner of your screen in your browser.

- Navigate to the left hand side of your screen that lists all of your calendars under “My calendars.” Select the ellipses for more options and select “Sharing and Settings.”

- Under “Access Permissions,” ensure that the button “Make Available to Public” is NOT checked.

Enable Waiting Room
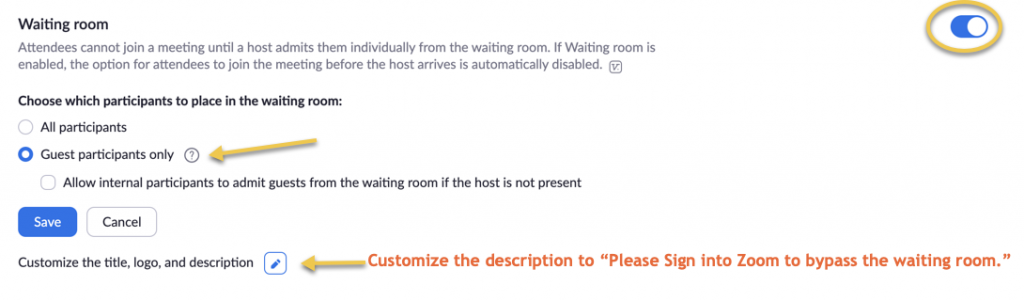
For your meetings that you are going to attend, enable Waiting room. Go to the meeting settings, and enable Waiting Room. You can choose Guest participants only to reduce the number of students you need to admit manually. That way, if students have signed into their Haverford Zoom accounts, they can bypass the waiting room. All Haverford students can get their Zoom accounts via haverford.zoom.us. You can customize the waiting room message to something like “Please Sign into Zoom to bypass the waiting room.“
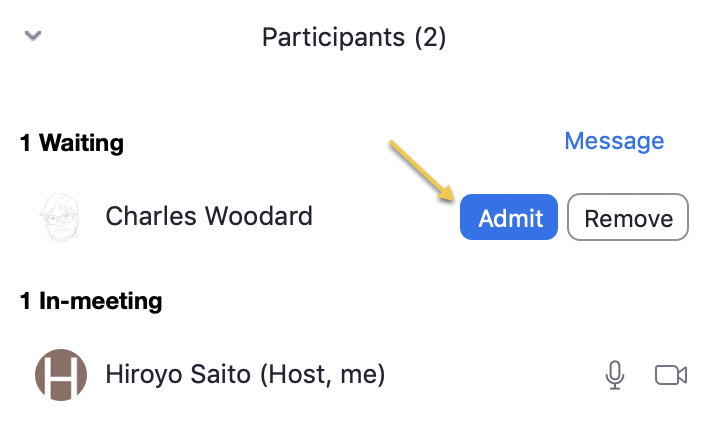
Then you can admit guest participants manually in the Participants window by clicking the Admit button.
Here is a video showing how Waiting Room works.
Use Zoom Password
We encourage you to consider using Zoom’s password features. Instructions on password feature can be found here.
Things you should know just in case
Mute All Participants
To avoid having unwanted voices speak at inappropriate times, follow these steps once you have started the meeting:
- Select the Manage Participants button in the Zoom toolbar.
- At the bottom of the Participants window, select More.
- Choose Mute Participants on Entry.
- Deselect Allow Participants to Unmute Themselves.

You should stop at various points and ask students if they have questions. Instruct them to use the Raise Hand feature to communicate to you that they would like to speak. You will see a raised hand next to a student’s name in the Participants window. You can manually unmute the student’s mic then.
Remove unwanted or disruptive participants
You can remove unwanted or disruptive participants.
- Select the Manage Participants button in the toolbar.
- Next to the person you want to remove, click More.
- From the list that appears, click Remove.

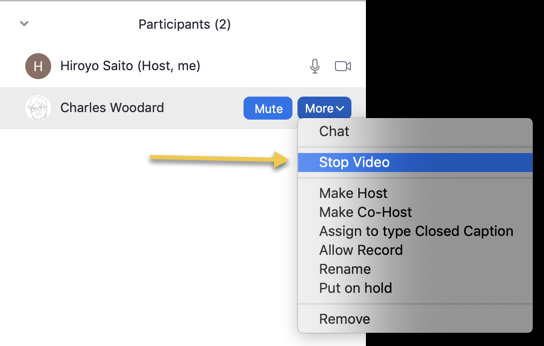
Stop unwelcomed webcam video or sounds
You can mute a participant’s microphone or disable their video.
- Select the Manage Participants button in the toolbar.
- Locate the person’s username.
- To the right of their name, mute their microphone or click more >Stop Video.
Lock your meeting.
Once you have all your students in your room, you can lock the meeting.
- Select the Manage Participants button in the toolbar.
- In the Participants window, go to the bottom and select More.
- Choose Lock Meeting.

Note: This is also easily accessible from the new Security tab.
Disable Attendee Annotation
By default, Annotation is enabled and attendees will be able to annotate on your shared screen at any time. (Attendees can click View Options > Annotate.)

While this feature can be great for collaborative activities, you can deactivate it once you are sharing your screen.
- Share your screen.
- Click More in the screen share controls.
- Select Disable Attendee Annotation.

If you want your students to annotate your shared screen, simply re-enable the feature by following the same steps.
Stop unwanted screen sharing.
As of March 22, by default, only the Host can share a screen. If you want to, you can change the setting and allow meeting attendees to share their screens during the meeting.
As a meeting host, you can stop screen sharing any time you want by clicking View Options at the top of your screen and selecting Stop Participant’s Sharing.
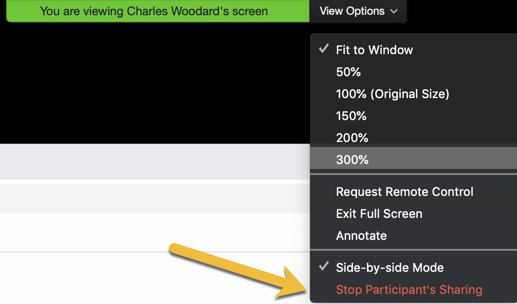
Note: This is also easily accessible from the new Security tab.
Control Chat Access
As a meeting host, you can control chat access.
- Select the Chat button in the toolbar.
- In the Chat pop-up window, click the ellipses for more options.
- You can decide if you want to allow attendees to chat with
- No one
- Host only
- Everyone publicly
- Everyone publicly and privately
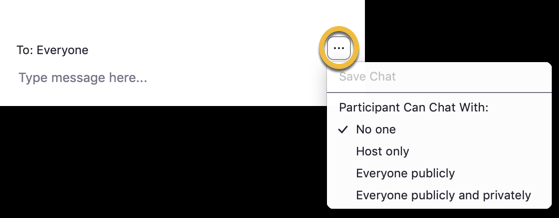
Please note that as of March 24, by default, you cannot share files through the in-meeting chat.
Thank you to Michelle Pacansky-Brock for sharing her helpful article!
Know Zoom’s limitations
There are certain things you want to use Moodle, rather than Zoom. For example,
- Pre-loading content. In Moodle, you can upload documents and assignments, and more. You cannot do any of those things in Zoom. Zoom is simply a live web conferencing platform that lets you share your web camera and screen with others.
- Assessment. While Zoom has a polling tool, it does not have a testing or exam tool. If you want to give your students a graded assessment, you will need to use Moodle.
- Breakout rooms. Zoom offers breakout rooms (see above for instructions) and you can either create them and assign students to them live during class or you can pre-assign participants to breakout rooms before class begins. Unfortunately, there is no way to pre-populate your breakout rooms with content or instructions before class begins. In addition, when your class meeting ends the breakout rooms that you create in Zoom disappear and will not appear in your next class meeting. Unfortunately, we are not aware of any workaround.
- Whiteboard. Zoom’s whiteboard (see Sharing a Whiteboard) is an effective tool for summarizing key points during discussions, but it is hard to annotate with a mouse. It would be much easier if you have a device such as iPad with Apple Pencil.
- Closed Captioning. Currently, closed captioning needs to be manually added by you (the meeting host) or another meeting attendee, assigned by the host. If you need to hire somebody who can caption, please contact Access and Disability services. Zoom, however, offers automatic transcription for Cloud Recording. If you need real-time closed captioning, you might want to try Google Hangout Meets.
Keep Up to Date with Zoom’s Features
Finally, Zoom regularly adds new features. To keep up to date with what’s new, check out Zoom’s New Releases page. For more detailed information, visit Zoom’s Release Notes page.
This document was created by members of the University of Southern California’s Academic Senate Committee on Information Services and modified by Instructional Technology Services at Haverford College.
Leave a comment