Introduction
Haverford Sites offers many unique opportunities for Faculty and Students to improve their digital literacy. Course blogs are a prime example of this. While students can be made authors of a course blog, it may be more beneficial for the students to create their own sites. This is where syndication comes in.
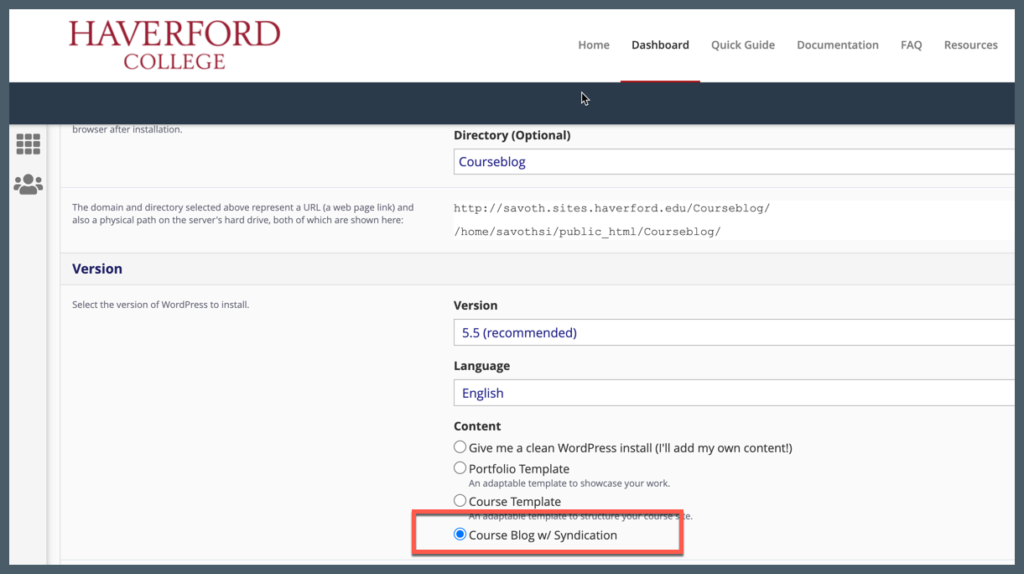
With blog syndication, faculty members can automatically pull blog posts from their students sites into a separate course site that they’ve created. IITS has created a WordPress template that can be installed through Haverford Sites, which is set up specifically for this purpose. Follow our Quick Quide instructions to set up your domain name and install WordPress. During the installation process, select “Course Blog w/ Syndication” as your template.
Once the template has been installed, follow the instructions below. These instructions are also included on the home page of the template. If you have further questions please email hc-techlearn@haverford.edu.
Syndication Instructions
This template has been set up to syndicate blog posts authored by your students in their own personal sites. The syndication is facilitated by a plug-in called FeedWordpress, which comes pre-installed and is activated on this template. Most of the settings for the plug-in have already been configured, but you will need to follow the instructions below to link each of your student’s blogs. These instructions can be deleted once completed.
Step 1: Gather URLs
In order to syndicate blog posts from your students, you will need a URL from each of them where those blog posts are being published on their site. Examples will look something like username.sites.haverford.edu/blog. Note that the URL contains the specific page where the blog is located, rather than just their site URL.
Note: If a student is using their blog for multiple courses, they will need to filter posts for your course into a new page.
Step 2: Add URLs to Syndication
In your WordPress dashboard, you will notice a tab at the bottom called Syndication. This is the FeedWordpress plug-in.
- Within its submenu, select “Syndicated Sites”.
- Type your student’s URL into the new source field in the top right and press add.
- Three feed options will appear. Within Option 1, press Use this feed.
- That student’s blog will now appear within Syndicated Sources.
- Repeat this process for the rest of your students.
Note: You could also select add multiple below the new source field in order to add all of your students’ URLs at once. Make sure to add each URL to its own line.


Step 3: Create Categories for Each Student
A parent category titled “Authors” has already been created for this template. Your next step is to create a sub-category for each student, so that it is easy to sort all of the posts that will be syndicated to this site. The steps will ensure that when a student’s post is syndicated to your site, it will automatically get categorized under their name.
- Within the “Syndicated Sites Settings”.
- Hover over one of your student’s blogs within Syndicated Sources and select categories.
- This will bring you to the Categories and Tags Settings for that student’s blog.
- Scroll down to the Categories block and press Add New Category.
- Type that student’s name in and then select “Authors” as the parent category.
- Press Add.
- Make sure that new category is checked.
- Save Changes at the bottom of the screen.
- Repeat this process for the rest of your students.


Step 4: Unpause Updates
Syndication updates are currently paused within this template in order to avoid feeding any posts before they are properly categorized.
- Navigate to Feeds and Updates via the plug-in’s drop down menu.
- Within the Update Scheduling block, select —PAUSE OR RESUME UPDATES–.
- Change from PAUSE to UPDATE.
- Save changes at the bottom of the screen.

Step 5: Check Your Blog for Syndicated Posts
At this point, all of your students blogs should be syndicating to your site’s blog. The ellipses next to your sites navigation will open the sidebar, which contains categories and tags for all syndicated posts. You can use this to filter posts by students (categories) or assignments (tags).
If you have are having trouble with any of these steps, please email hc-techlearn@haverford.edu.
Leave a comment