As of February 23, 2021, all meetings and webinars created with your licensed Haverford Zoom account have the option for auto-transcription—AI-powered real-time captioning for your meeting. You and your participants will be able to see those captions during the meeting. There is also a setting that hosts can enable prior to a meeting that allow participants to save the live transcripts for future reference.
Enable Live Transcription on Zoom meetings you host
If you are hosting a meeting using an account authenticated at haverford.zoom.us, you can enable live subtitles and transcription for your meeting. Follow the steps below.
1. Select the Live Transcript button
Meeting hosts have a Live Transcript button on their Zoom toolbar. If you do not see the Live Transcript button, first make sure the Zoom toolbar shows other options available to the host, such as the Security shield option. If you do not see these, make sure you are logged into your haverford.zoom.us account.

If you are properly logged in and still unable to see the Live Transcript button, then you may need to select More. Often times this is based on how your Zoom window is sized.

2. Enable Auto-Transcription
Once you have selected Live Transcript, select the option to Enable Auto-Transcription. This enables subtitles and transcription for all meeting participants.
Host and Participants can display captions
Once Live Transcripts are enabled, the host and participants can decide to view them as subtitles, a transcript, both, or neither.
As soon as the host enables auto transcription , participants will see the message “Live transcript is available.”
Participants can then click on the Live Transcript button to Show Subtitles (text box on main Zoom window showing phrases as they are spoken), View Full Transcript (chat like window showing the complete transcript of meeting, including who said what), and Subtitle Settings (adjust the subtitle font size). Note that the placement of this button moves to the top of the screen when someone is sharing their screen. It may also be located under “more” if your window is narrow.
Ability to save transcripts
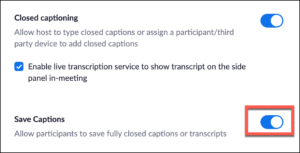
NOTE: If you want to give your participants the ability to save the live transcript, check the option to save captions in your haverford.zoom.us account settings. This setting needs to be changed prior to the start of the meeting.
If you have any questions about this feature please email hc-techlearn@haverford.edu.


Leave a comment