Bionic will re-open for registration from Monday, August 31 through Labor Day (Monday, September 7)….While students are making these schedule adjustments, they will also browse courses in Moodle to find more information about courses they would normally discover when shopping.
Jim Keane, Registrar
This post outlines what you need to do to allow students to “shop” your course(s) online.
Make your course visible to students
Until you make your course visible, students will not be able to see the video or document you created!
Students will not see your course until you want them to see it. Once you have your video to your liking, MAKE THE COURSE VISIBLE to students.

- Click on the course administration gear icon (
 ) dropdown
 - Select edit settings.
- Change visible to show.
- Scroll to the bottom and click save changes.
Still need to post?
You can also easily add a document file or link the Zoom video to your course.
After you log into moodle.haverford.edu and select your course shell follow the steps below.
Note: If there is more than one section of your course, you can use the shell for all sections, named something like COURSEID – CourseName (A01+A02 Combined), instead of uploading the same information to multiple course shells. The combined shell has enrollments from all the sections.

- Click on the course administration gear icon () dropdown.
- Select Turn editing on.
- To add a document: Drag your file to the top section of your course.
To create a video and share it with your class:- Add a Zoom Moodle link to your course
- Schedule a Zoom meeting via the link. Give the meeting a name like “Course Name—Intro video”
- Start the meeting. Use Zoom to video record your course intro statement. Make sure you save the meeting to the cloud. See the suggestions below for what to put in the video.
- Add a Panopto link, with a name like “Class recording—including welcome video“
- That’s all you need to do. However, if you want to edit the video or put embed it directly on your course page, you can do so. Our video instructions show some of the extra options.
Want to make a video, but not sure how?
You can let students know about your course just by creating a text document and uploading the document to Moodle. However, a video may be more welcoming for students. A video may seem daunting at first, but you can do it! Here are a few basic steps for creating the video and linking the video in Moodle:
- Think about how you want to present yourself and your course to students. What do you want your students to know about you? What are the goals of the course? What kind of assignments will students have? Will there be guest lecturers or other featured events? How is your course relevant to students’ lives and/or further studies? Keep in mind that this is an important first impression.
- Write a script or an outline before recording.
- Start a Zoom meeting with just yourself and record the video to the cloud in Zoom. Cloud recordings are easy to share and provide transcription.
- Find the shareable link for your Zoom video in the “recordings” tab and post in Moodle as a URL resource. You can include the password in the URL description and check the option to display the description on the course page.
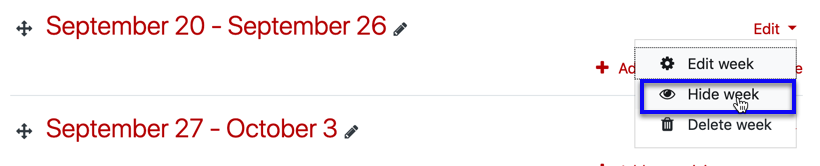
Hide sections you are not ready to share
At this point you may have sections you are not yet ready to share. You can hide any sections or items that you don’t want students to see now.
Questions?
Please email hc-techlearn@haverford.edu if you want any help!